LANDSCAPE PHOTOGRAPY: PRODUCTION DIARY:
- Hannah

- Jan 25, 2022
- 9 min read
Updated: Feb 15, 2022
My photography brief told me that I could pick between three genres to then create that into my project - from documentary, fashion and landscape, I chose the latter. I did this because I live in quite a rural area and so I knew some places which would be ideal for the shoot location, as well as this, I am confident in this area after taking rural and outdoor style photos for many years, so I knew I would capture with high quality.

At this point I thought that a great location would have been Rivington Pike, although was struggling to think of many interior areas here as it is a very outdoorsy place. So I asked my assessor what she thought, in case there were any areas surrounding, she suggested the Japanese Terraced Gardens, which I then researched. There were some great options when it comes to framing in the area (which she pointed out) that I then could recognise similarities to in my own photography.
PITCHING MY PLAN:

After discussing my ideas with my assessor on the topic in my pitch, she wrote some notes on my plans. In this talk I explained how I planned to shoot in Rivington Pike and their Terraced gardens - talking about the traveling as well as my general ideas and themes.
I would like for my project to be a little darker in places by creating a darker and more intense environment, this makes the viewer think a little more about what they're looking at and also their own life. For example, during my research I discovered the photographer Edward Steichen; his work is, generally, a wide shot of a simple setting (maybe trees or a misty body of water) but he makes it seem moody and gives depth to it. The image is no longer something to look at and
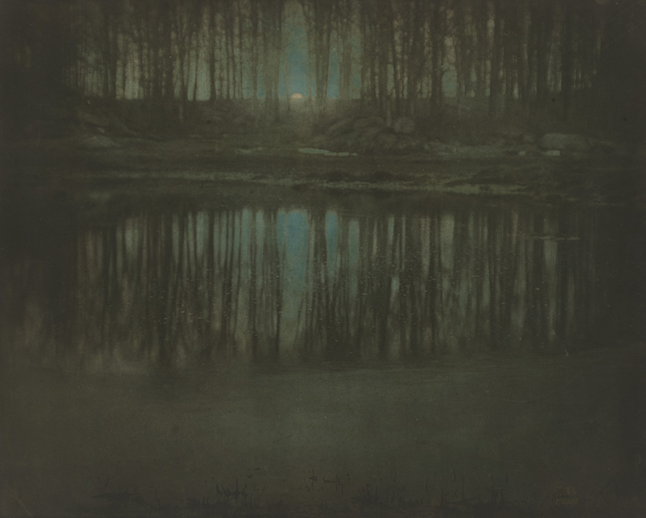
appreciate for the bright colours, or even the colour scheme, as it will be something almost black and white with high contrast as this is the only way to distinguish what it is he has actually taken. For this reason, I know that the location that I have chosen will be a great place to capture this aesthetic.
PREPARATION:
RISK ASSESSMENT:
My photoshoot will be in an outdoors, mainly, wooded area, so we will need to be moving at a slow enough pace of caution. There are risks of tripping and slipping, falling down the very steep hills. This would be bad for a few reasons, but also if this was a professional shoot then I may be viable and potentially sued - as it is my responsibility as the organiser of the event. Also, the risk assessment must have been completed for my own legal defense benefit if anything were to go down.

STORING MY CONTENT:

I used Google Drive - using my professional email account - to store my footage, photos and preparation content.
CALL SHEET:

For safety reasons, as well as direction, I planned to go on the photoshoot with a photographer friend of mine. Here is the call sheet that I sent him, telling him of the location and details which will have helped him. For example, the times of the day were only a few hours, between dinner and tea, so I said how we will not be leaving time for a food break. Although, along the way, due to the location being outdoors, if he ever needed to rest or sit down, of course, he was allowed.
THE PHOTOSHOOT:
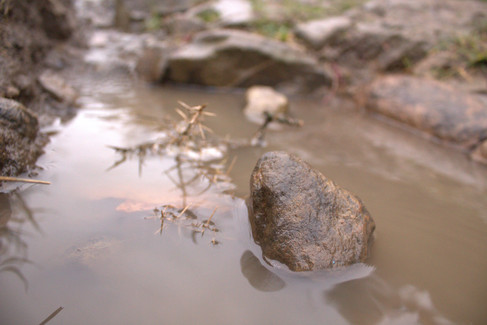
The photoshoot was very successful overall. I collected a plethora of shots, some similar to some of the ones I planed through research, but also many of spontaneity as this is how I work best. When walking through the gardens and up the hills, there are many interesting opportunities, which the average walker would have completely missed all together, so I always keep my eye out for an interesting shot. This is how many of my photographs end up being so good, because it is often about the background behind which may change (sunsets change every night, for example) or even the speed of the wind. Well, the spontaneity was most definitely the thing that helped me capture the shot below. There are many puddles and random little rocks pottering around, creating such unusual angles when paired with reflections. Below, you can see the sorts of situations you have to get yourself into in order to get the perfect shot.

There was often the danger of mud and slipping that I put myself into throughout this photoshoot, as the day turned out to be very wet and a little windy at times. All while being up a hill and, once up there, rather exposed, it was something that I needed to be physically fit enough for. I went on the photoshoot with my friend, for personal safety reasons (a young 'girl' being in the woods alone was not something I wanted to endure) as well as help in navigating. So, there were times when I needed to direct him in and out of places to get the perfect shot. We have a perfect example below, as I was trying to figure out the right angle, so I have a few photos that look similar, though, once I had found the right angle, his foot was in frame. I needed to reshoot with him slightly off-side.


CONTACT SHEETS:
I took between 400 and 500 photographs on my photoshoot, with roughly half being on a DSLR camera and the other half on my phone. Upon attending my photoshoot there was an unexpected issue where the wrong SD card was inserted into the camera so there were only a limited amount of shots that were free for me to take / use. With this in mind, while knowing I can get very 'snap happy', as they say, I needed to ensure that I still had a way to take decent quality photos. My phone is a very recent model - iPhone 12 - so it has great specifications and camera, knowing this I knew I could take more creative shots here, which maybe didn't need the DSLR's specific settings (like shutter speed / ISO).
CAMERA:


PHONE:
The shots on my phone became really useful, in particular, for the wide angle lens that it has. I used this technique for a few reasons, to frame a photo more interestingly using the trees, and to in turn make sure that the composition isn't just bland. The feature almost stretches the whole piece out, so when you use shallow depth of field, with an subject close to the camera, it becomes incredibly elongated. I have found that this majorly ensured that this creates such a unique composition, when framing is involved, it really becomes heightened even more. But another pro of this, is that it is stretched in the actual photo itself, there is no need to stretch separately during editing. When it comes to stretching, in photoshop, it can become confusing to use the original photo layer as well as the edited version, especially when it comes to editing the more common things like colour grading, clarity and contrast.


EDITING:
After going through and seeing which of my photos were good enough, in terms of framing and clarity more specifically, because I like to take multiple photos of one setting from different angles, I choose which ones are ready to edit. Due to my camera photos being taken as a 'RAW' file type, I needed to edit in Adobe Lightroom as it could handle what I all the memory and detail of each photograph.

You can see quite clearly, below, what my editing did to the photo and how exactly the colour grading and curves specifically enhanced the attraction. The colours 'pop' a lot more and you can really understand the difference within the heightened contrast. This light and dark, when paired with the colour grading, especially, makes the mud gleam that little bit extra. The way that the light hits the uppermost parts actually becomes attractive, something you might not have expected to think about mud today..

After editing this image, I looked back through my inspirational photographers and photographs, including the themes. After rereading over my notes and plans that I wanted out of this photoshoot, I decided to revisit Adobe Lightroom. The majority of my aspirations were to achieve an image which was dark and moody, yet still flourished through with little colour.


For the above image, I desired for the vertical lines to be parallel, and, therefore, found the 'Guided Upright' tool very useful. With it, I could draw two lines, which the Adobe Lightroom software would then make parallel for me. Also with this image, I decided to enhance the deep warm colours with the specific 'red' settings within the editing software.
EVALUATION:
I believe that the whole photoshoot was successful. My genre was landscapes, so of course I had the wide ability to capture ..landscapes. However, my only issue, both during the planning and day itself, was the interior section. My location had a few good places that I could use to frame images, yet, they were very limited. In such an outdoors place, legit what it's known for and the purpose is, there weren't many buildings that you could go inside. One of the only examples of somewhere with an inside was gated and locked up, it looked a little like it was being used for storage for summer events as the structure is right behind a big patch of grass.
In terms of the compositions, I think that the photos were exactly what I aimed to capture. I found framing with the fences as well as the buildings at site, which set off the landscape beautifully.
ISSUES:
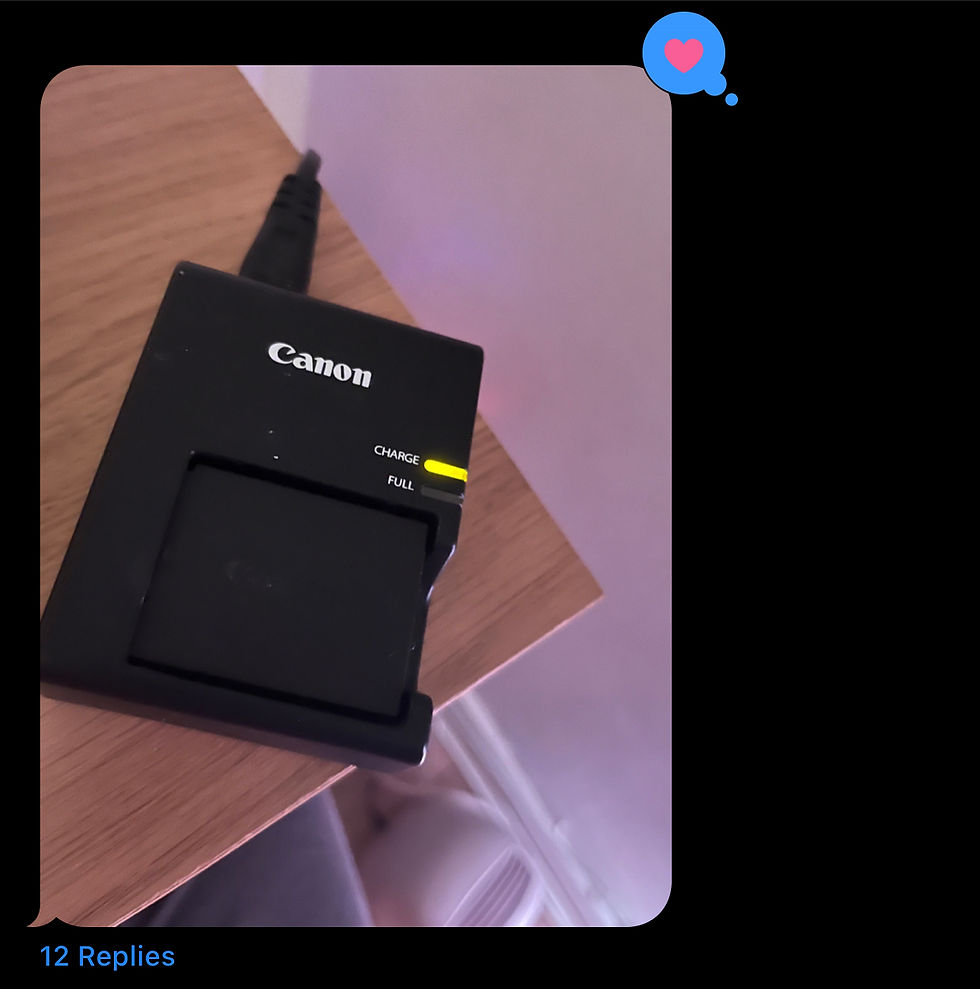
When it came to the preparation - closer to the event day - I had to make sure of the practicalities. One thing which would have ruined the whole shoot is if the DSLR camera was not available (I used my photographer friend's camera), in terms of charging or storage. Both of these things became a problem..but were swiftly dealt with.
First, the night before Walker made sure that the camera was on charge so that there was battery for the next day, however when he woke up there was an issue overnight where it didn't actually charge, despite showing signs that it was. The next

morning, he made sure to charge it back up. It didn't need long so we just delayed the shoot time by an hour, to start at 12:00 noon instead. This problem was something we did not anticipate, although, it didn't become something that shifted the whole day out of shift, because each of us did not have a busy day other than this photoshoot. This was good to know because I could confidently delay the time by an hour, knowing that we wouldn't have to rush to avoid clashing with any other commitments.
The other issue was that the SD card in the camera was swapped, meaning that there was an older card in - meaning that there was little storage free. It was planned for the most recent SD card to be used so that it had hundreds of photos free to take, although this was not the case. It was quite lucky that the SD card's photos were from early 2019 and from shoots that he hadn't deleted yet, but planned to, since he wasn't going to use them for anything and didn't even like them anymore to edit any. This meant that we went through and deleted a bunch, in order to create space: this was highly successful. There went from around 30 photos free to a few hundred which turned out well. Unplanned, I happened to use the very last photo free as my very last photo I wanted to take with the camera at the end of the shoot - what a coincidence. Regardless of this, as I was planning on taking photos on my phone, so I had already ensured that I had enough storage, which was fortunate for me to do.
PEER-REVIEW:
'I think they’re really cohesive cause you stayed in the same location which was Rivington, except the photo showing the menu. I love the vibe of it, dark and lonely. but for me doesn’t fit landscape photography. You’ve tried out different angles, some macro close up shots and some kinda wider shots. Cause for me personally I love wider shots but you’ve got to remember the close ups too and find beauty in the details of nature. There’s some framing there, reflections really nice. They have that “muddy” vibe that I was talking to you about. It looks like a proper dull day, but there’s something so homely about it. Like and British. It’s not absolutely stunning landscape photography at The Grand Canyon it’s only Rivington but it fulls like home. I am taken back to our day out and I can feel being there, the mud on my shoes, the air, it makes me want to go throw my jeans in the wash and take a shower and I’m in bed.'
'There’s some variety of interior and exterior, but mainly exterior. But for me your genre landscape shouldn’t have too much interior cause.. landscape is mainly outdoors. But I think like the wooden fence framing the stream was nice, shows the contrast between the two. And like the photo of the gardens, you brought out the greens so the interior has that natural vibe.'

'M favourite edited so far, are like this, what I said about the framing. I love it..but I would crop more.'

'And this like the muddy feel I said in the text above. I love actually in this how there’s a shoe print, connecting people with nature and the connection with the two. Cause usually nature photography focuses on details of plants and stuff, which is because of the plant itself that’s how it looks. But the shoe print, like a person has created that, left their mark in nature. You can see it in an almost artistic way, I assume it’s your shoe but like you created your own art in that mud. And that shoe can also connect the person viewing it to the photo more, like they’re there. That’s how I see it at least.'

'I also love the photos featuring reflection, as I have said, I'm obsessed with water at the minute and I just love the water's reflection in this photo too.'
One of the photographs he is talking about here, is the one to the right. You can see the camera stats. I didn't need the aperture to be very high, because at this point of the day, there was a fair amount of sun. We can see this , also, reflected (hehe) in the ISO number, a fairly low 125.
Comments